This Adobe Illustrator tutorial will show you how to create an abstract art that can be used for wallpaper, website header or background images. It is fun and easy. You will learn how to use the Warp and Twirl tool to create abstract vector art in minutes. Users with basic skills should be able to handle this tutorial. To continue on this tutorial, you need Adobe Illustrator CS or above.
Understanding The Tools (Warp and Twirl)
Run Illustrator and create a new document, 8 x 10 inches, CMYK color mode. Double click on the Warp tool icon (on the toolbar) to activate the option panel. The setting I have is: width 1.4", height 1.4", and intensity 50%.

We will be using the Warp tool a lot, so tear off the tool set for quick access. Click and hold on the Warp tool icon until you see a dropdown panel, click on the Tearoff icon.

Warp Tool
Draw a box with the Rectangle tool. Select the Warp tool and the box. Drag your cursor above the object. Notice how the object warped based on your mouse movement.
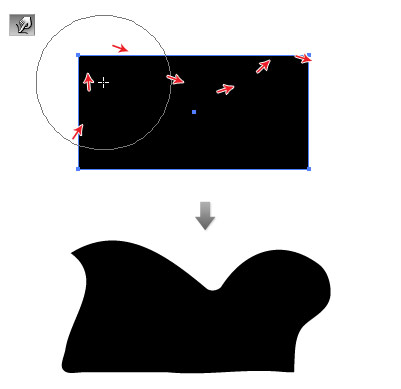
Create another box. Now, go crazy and keep on spinning your mouse around the shape.

Remember: your result will look different than mine due to your settings and mouse movement.
Twirl Tool
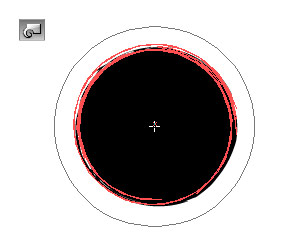
Draw a rectangle box. Select the Twirl tool. With the box selected, press and hold your cursor above the box. It will twirl the object continously.

Create another box. This time, quickly drag the mouse in zig zag movement.

Let’s Begin
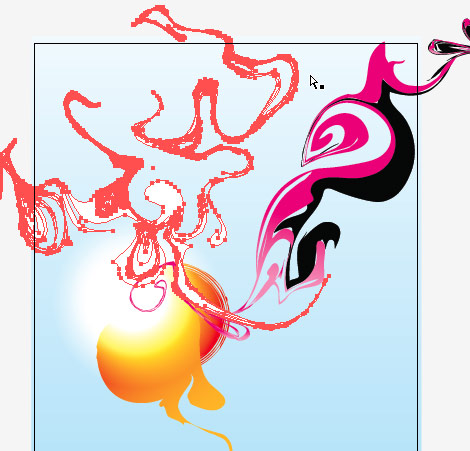
Delete all the test objects. Create a big rectangle shape to cover the document canvas. Fill it with blue gradient. Lock this layer.

Create a new layer. Draw two long rectangle shapes. Fill one with black color and another with magenta gradient. With both rectangle objects selected, use the Twirl tool and quickly spin the mouse across.

Rotate the object in 45 degree and place it in the upper right corner.

Draw a red circle. Select the Twirl tool. Press and hold on the object until you get a sun-looking circle. Place the circle in the back.

Draw another circle and fill it with red-orange gradient. Select the Twirl tool and quickly drag on its edge and place it above the sun shape.


Glowing Effect
Create a circle and fill it with radial gradient. In the gradient slider, select yellow for one end and black for another end (make sure the black is C=100, Y=100, M=100, K=100). Set the blending mode to Screen.

Duplicate the glowing circle. Shrink it a bit and shift it up. Change the yellow color to white.

Smoke-Like Shape
Create a rectangle shape. With the Twirl tool, randomly drag and spin the mouse back and forth to create a smoke-like shape. Fill it with white color.
Fire-Ball-Like Shape
Randomly draw 4 circles in different sizes. With the Twirl tool, drag the mouse in spiral movement.

Create another set of twirling shapes with the Twirl tool. Then fill it with orange-red gradient.

Electric-Like Strokes
Create a thin long rectangle shape. Use the Twirl tool, quickly drag the mouse across the shape in zig zag movement.
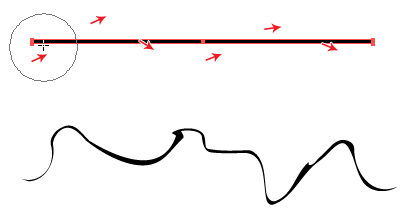
Then fill them with various color.

Overlay Circles
Draw various size of circles and send them to the back. Fill them with gradient and set the blending mode to Multiply.

Dark Glowing Circles
Create two circles and fill them with blue-white radial gradient. Send them to the back. Set the blending mode to Multiply.

Touch-Up
Look around the artwork, find the un-smooth shapes, smudge it with the Warp tool. Make them look rounded and liquified.

Final Remarks
I have only used the Warp and Twirl tool in this tutorial. Don’t forget to try out the Scallop, Crystallize, and Wrinkle tool. Play around with the tool options and shapes. You don’t have to start off with the rectangle shape, try the star or irregular shapes. They can also be used for creating texturized patterns.

142 Comments
Comments are closed.
aledesign.it
Nice post. Important to learn more about the program. Thanks for the sharing.
Lorraine
This looks fantastic! Thanks for a great tutorial.
Alex
That’s awesome, another place to find abstract illustrations over here http://www.designious.com/illustrations/abstract
SteHan Botha
Thanks a lot Nick – certainly acts as great instruction + inspiration! ;-)
mark sayers
Great idea.
I have always written off tools like this as a bit gimmicky, but that works really well.
Great job (as always)
William Rodriguez
I used to love using the warp tools with vector graphics. I haven’t used them in so long, I forgot how fun they can be. Thanks for the reminder, I need to get back to my roots and implement these techniques in my work again. Great post!
Cyprian Gwóźdź
Thank you :-)
Emyr Tabrizi
Nice work Nick. Cheers.
web2000
Fun tutorial with a great result- thanks
Web Hosting Expert
that is really amazing, great post !!!
Kayla
Awesome tutorial, I’ll definitely be trying it out!
Stuart
This is just what I have been looking for. I love the illustrations you do. Cheers
steve
well done tutorial, thanks!
The Frosty
No matter how good your tutorials are on Illustrator, I still can’t get it down.
Kaplang
really great post, thanks :)
Minhaj
thnx nick :)
http://minnix.tumblr.com/post/171457197/abstract-vector-art
David
Wow, Great work… it looks real effective!
Cookie Creative - Graphic Design Manchester
Fantastic tut. :)
Sarah~
Hauu~ really cool!~
I’m a high-school student in New Zealand and this website was recommended to us.
I love it! Keep it up!~
Sarah. :3.
Renata
Love it everything in this website is spectacular!!!
margaret
cool..I’m about to try it..
Marie
Hey there, Fantastic tutorial. I’ve just started a blog myself on how I’m learning how to use programs such as illustrator etc, and ive just used your tutorial to create my first bit of abstract art. You have really helped me produce something I’m very happy with so thankyou. Heres what I managed , of course not as good as yours but without your tutorial i wouldnt have managed it at all , so thankyou again.
My abstract art version: http://webdesignwhim.com/downloads/abstractart3.gif
free vector
great creative tuts. Lovely. Thanks share Nick
BebopDesigner
Brilliant tut! This is so handy. Thanks for posting.
(maldad)
cool posting! never used that tool for more than a few retouches… now i see why they made it!
yuda
Nice i love it….. ^_^
michael
this tutorial is good if someone is new to this style.
im doing this kind of art pretty successful for about 3 years now and this is actually how i started.
idiocracy kills
Did you get the chance to toy with the vector art tool from Creature House?
ricmanx
Excellent!!
Elizabeth K. Barone
Finally – your secrets revealed! ;D
I’ve been dying to know how to do this, and I don’t use Illustrator much so I couldn’t figure it out on my own. It seems so simple now! I can’t wait to play around a little more. Thank you!
Car logos
Car logos! List of car logos.Find your favorite car logos and car wallpapers at carlogos.org
Daniel Keegan
Most excellent tutorial. I am new to Illustrator and its potential.
I will be following all your other tutorials closely.
Thank you!
Barbara Beethoven
tanks,
very nice tutorial….
Roch
Vectors excite me in a way that will probably, very soon, become illegal.
fatty
Art ? or crap
yara
Hi! I love your site, i’m always reading your posts! I just tought you should take a look at this site, they totally stole your artwork!
BTW, excellent post!
Michèle
Finally had the time to work thru your tutorial. My creation looks great! Thanks… so many things one can do with AI & AP – that what I use it for and was taught – this wasn’t even covered (plus we don’t use stuff like this at work – but it is always great to learn something new! Thanx!
Blaberize
@fatty Many people have trouble understanding and appreciating this type of art. When you look at an abstract art, you often have no idea what it is you are actually seeing. Abstract art are special. Abstract art purposely departs from normal appearances. You might want to look at this http://www.marichter.com http://blaberize.com/2009/08/28-awe-inspiring-abstract-wallpapers/
@Nick Your tutorials are excellent!
Kaplang
really good tutorial, thanks :)
Julia
All my life designing with freehand. I need this tutorial to improve my illustrators skills.
Keith D
I love it, but how do I achieve the same effect in Adobe fireworks?
If anybody does a translation to Fireworks… please let me know.
tatilkaynak.com
oh thanks your tutorials!
Sites Sorocaba
illustrator rulez! tks mate
lombok island
this is awsome. ilustrator is great.
Jennifer
This tutorial was greatly appreciated. I’d been staying away from Illustrator because I had trouble mastering the pen tool. You’ve shown me that you can get a lot out of it and not even touch the pen tool. This is soooo cool.
Thanks
Samar
The tutorial was amazing! More such simple and well written tutorials please! Thanks. :)
Ben Rama
love the ai
Kris
Awesome! :) Great tutorial, learned a few new things! I haven’t yet used Multiply as a blend mode, so I’ll definitely try that out.
I *love* that Twirl feature! Fell in love with it when I was a uni student and designed myself a tattoo with it! lol :)
moro
WOW !!!!! Great … really good tutorial for me ….. thanks so much !!!! :)
keici
Great tuts, thanks for sharing. Great effect using ai.
wien
very nice picture
franfun
Nice tutorial, vector art is a little bit difficult!!
Daniel (DesignPlusUltra)
Awesome stuff. The outcome looks so good and unique every time.
You can also experiment with the Distort-Effects in Photoshop to get such results.
radioflyer
Great tutorial, Thanks to much. Simple and easy to learn.
Multimedia Design
..interesting… don’t know if i’d call it art or even wish to replicate this, but it’s an interesting use of randomness.
Eko Subagio
I like this, very very helpfull to produce great art, no need to go to classroom just sitdown and open webdesignerwall
Nate Coventry
You guys haven’t posted in a while. What’s the deal?
andy
WOW !!!!! Great … really good tutorial for me
abdel ali
Great man ,really thanks :)
dandy
Really nicely abstracted. Looks cool, though i cant find any place for this on web to fit in.
andrew
excellent tutorial.
张筱雨人体艺术摄影
http://www.zhangxiaoyu114.cn支持了。
Senph42
Good tutorial, the techniques described here are very easy but they give a very good result!
DesignerGal
Wow, can you say horrendous!
Andre
Hmm, good techniques!
Cyrus
Great , Illustrator: Abstract Vector Art
Great article. CSS saved webdesign
Cyrus
Visit http://www.psdtoxhtmlcoder.com
Cyrus
Great , Illustrator: Abstract Vector Art
Great article. CSS saved webdesign
Cyrus
Visit http://www.psdtoxhtmlcoder.com
Lance
Awesome tutorial – that is great design.
josh
Boy oh boy. you make it look so easy to create cheap, trendy digital illustration. Not sure how you can call this ‘art’.
Augusto
In 20 years i never see anything like this… beauty…
Richard
Here’s my Outcome. Excellent tutorial!
http://i33.tinypic.com/153bkfb.png
Facebook Developer
So nice , you should promote your post on facebook.
purplerain
nice tips. been wondering how to do these effects fast.
stron internetowych
Boy oh boy. you make it look so easy to create cheap, trendy digital illustration. Not sure how you can call this ‘art’.
Themescope
NIce. I’m just starting to learn illustrator
rx1 zayıflama ilacı
nice tips. been wondering how to do these effects fast.
Sarah
Really cool ^^!
Alex Mathers
This tutorial is really clear and helpful. Thanks!
Alex
Henry
That is definitely some wild design! This website is incredible though. Great design!
ameer
i AM VERY IMPRESSIVE
Jako
So nice , you should promote your post on facebook.
panel radyatör
wonderful job thanks bro
acai
This tutorial is really clear and helpful. Thanks!
Lyons Solutions Web Design
Helpful tip my friend. Thanks for that.
bedava hosting
thanksssss
Jodi
You are awesome!! I have had the whole cs4 suite for awhile and have been terrified to try illustrator or fireworks, I just use dreamweaver and photoshop. I’ll have to give it “whirl”……..
klix
wanna learn
klix
nice enger
EastFilters
http://www.eastfilters.com
Auto Filters, Replacement Elements For Fuel Filters, Turbine Fuel Filters, Replacement for Fuel Filters, Air Filters, Filter Water Separators, Fuel Purification Systems, Engine Fuel Filters, Gasoline Engine Fuel Filter, Diesel Engine Fuel Filter, Trailer Engine Fuel filter, Engine Fuel filter, Car Filter, auto fuel filters, Truck Fuel Filter and Motor Yacht parts.
Ben
Awesome. I always wondered how you achieved this effect in your art. I had concluded it must have something to do with using a tablet or other piece of hardware/software I didn’t have access too. Very excited to start playing around with this effect!
Awesome games
Real real great job ! I want stuff like this !
ShelGfx
thanks for this tutorial.. it was really helpful :)
DarkenedSoul
And again: simple but handy! i’m really going to tear this site inside out ;)
vincentdresses
喜欢你们的设计与技术,常来看看
jeprie
wow! great tips. never tough about this simple step.
capsiplex
thanks for this tutorial.
lono
nice little tutorial.
köpek oyunları
Diesel Engine
Tanya
AWESOME tutorial! it shows you how to make abstract vector art, AND it tells you how to be creative and use your own style =].
Thank you!! =D
Tanya ^^
Web Design
very very useful thanks
Art for business
This looks great. Thanks again for another amazing easy to follow tutorial.
nini
Thank you for the tutorial, never thought using this tools could be so easy and effective.
Randy
ok, I had tons of fun with this, thanks for the tutorial!!!
Asif Ali
Awesome tutorial (Y)
Progs4u
Thank you so much ..
You are very cool
Arama Motoru Optimizasyonu
I was searching for header background images and I am now here.
Great tutorial.
Thanks.
acai
Thanks for text very good ::)
Adrian
Oh dear god thank you so much for this
الاندرويد
very creative and helpful
someboody
coolstorybro
joan
Cool how Illustrator can turn simple shapes into works of art. Thanks Adobe! and thank you for the fun tute.
Sofa Slipcover %0A
abstract art have share some of its unique beauty when it comes to art. i like abstract art because it is mysterious ‘:”
Hasinda
maxxxxxxxxx
Melvins
Very amazing and creative one. Looking very nice effects. Thanks for sharing with us.
Los Angeles Web Design
jkahren
Thank you! this is just what I needed for a project I’m working on! Very well presented tutorial. Loved the intro and practice with the warp tools at the beginning. You are a teacher!
V-Boom
Hi, How are you?
Life goes on. But the Web sites, updates never stops. What’s New in new systems and services every day is present. Internet under 6 hours a day by visiting the web sites, I do self assessments.
This site is useful to see the purpose of service. But it could have been stronger than some of the issues and services. We think that Internet users spend just a good time. This hour of fun we want to learn something new.
A request is the administrator of this site will be the best in your hand, thinking of us. Thank you for your attention. Wishing you success in your work.
Remember, there is a statement that failure. There are just lazy. Whatever it is, plays …
Best Regards …
Power Balance
They make is so easy at presenting information that once you get the hang of it you never want to have to miss them again.
mikwillson
Your article’s resource box should help to persuade your readers. No matter how amazing your article is if it’s not succeeding in driving traffic to your website cheap uggs
Henry Peise
Though white iphone 4 is at high price, but with all-powerful function, we can see lots of people just crazy for the latest white iphone 4.
Preston Racette
Great post! Keep them comming!
Juno Mindoes
Though white iphone 4 is at high price, but with all-powerful function, we can see lots of people just crazy for the latest white iphone 4.
kosmodisk
thank yeahk
Uçak Bileti
çok güzel hepsi birbirinden
altin çilek form seti
thank yeahk
Hannah
oh my days.. im designing a portfolio website for myself at college at the moment and struggling to find something to make it look well amazing! AND I FOUND IT i love this :D
altın çilek
That’s Great! Thanks for the post!
web tasarımı
nice sharing.. thank you..
How To Get Taller | How To Put On A Condom
Splendid work. Thank you so much for this post. Interesting content.
How To Put On A Condom | How To Get Taller
What’s the best word I can think of with your work? Perfection!!!
dexx
Different thinking, contains a problem to produce several possible solutions.
WALIA
LOVE UR WORK……………..THANKS FOR THIS..
katalog tasarım
nice sharing thanxxxx
Nargile
Good job.thank you
complex41
And then he handed you the thirty-five 45
sagar
great and nice sharing, thank you.
Sistemofis
love your work, very grande…
bulut
grate job, very creative…
akif
very good and inspiring
Sreeram
The images you are sharing are spectacular with lots of creativity Nice sharing…………………
Arts management degree
Home artwork tips are generally an essential section of just about any household painting work. You may request the reason why. That is thus for your easy reason why immediately after lights first of all, impact on the particular …e studio marketing
Odelia Nothum
Thank you a lot for sharing this with all of us you actually know what you’re talking approximately! Bookmarked. Please also visit my web site =). We can have a hyperlink change agreement among us!
yates en Ibiza
Im designing a portfolio website for myself at college at the moment and struggling to find something to make it look well amazing!